
Restaurant Takeout and Pickup Area Design: Orders, Couriers, Shelves, and Flow
A field guide to restaurant takeout and pickup flow: separate four arrival journeys, build a staff-side packing sequence, plan accessible handoff and recovery, then test the busiest ten minutes.

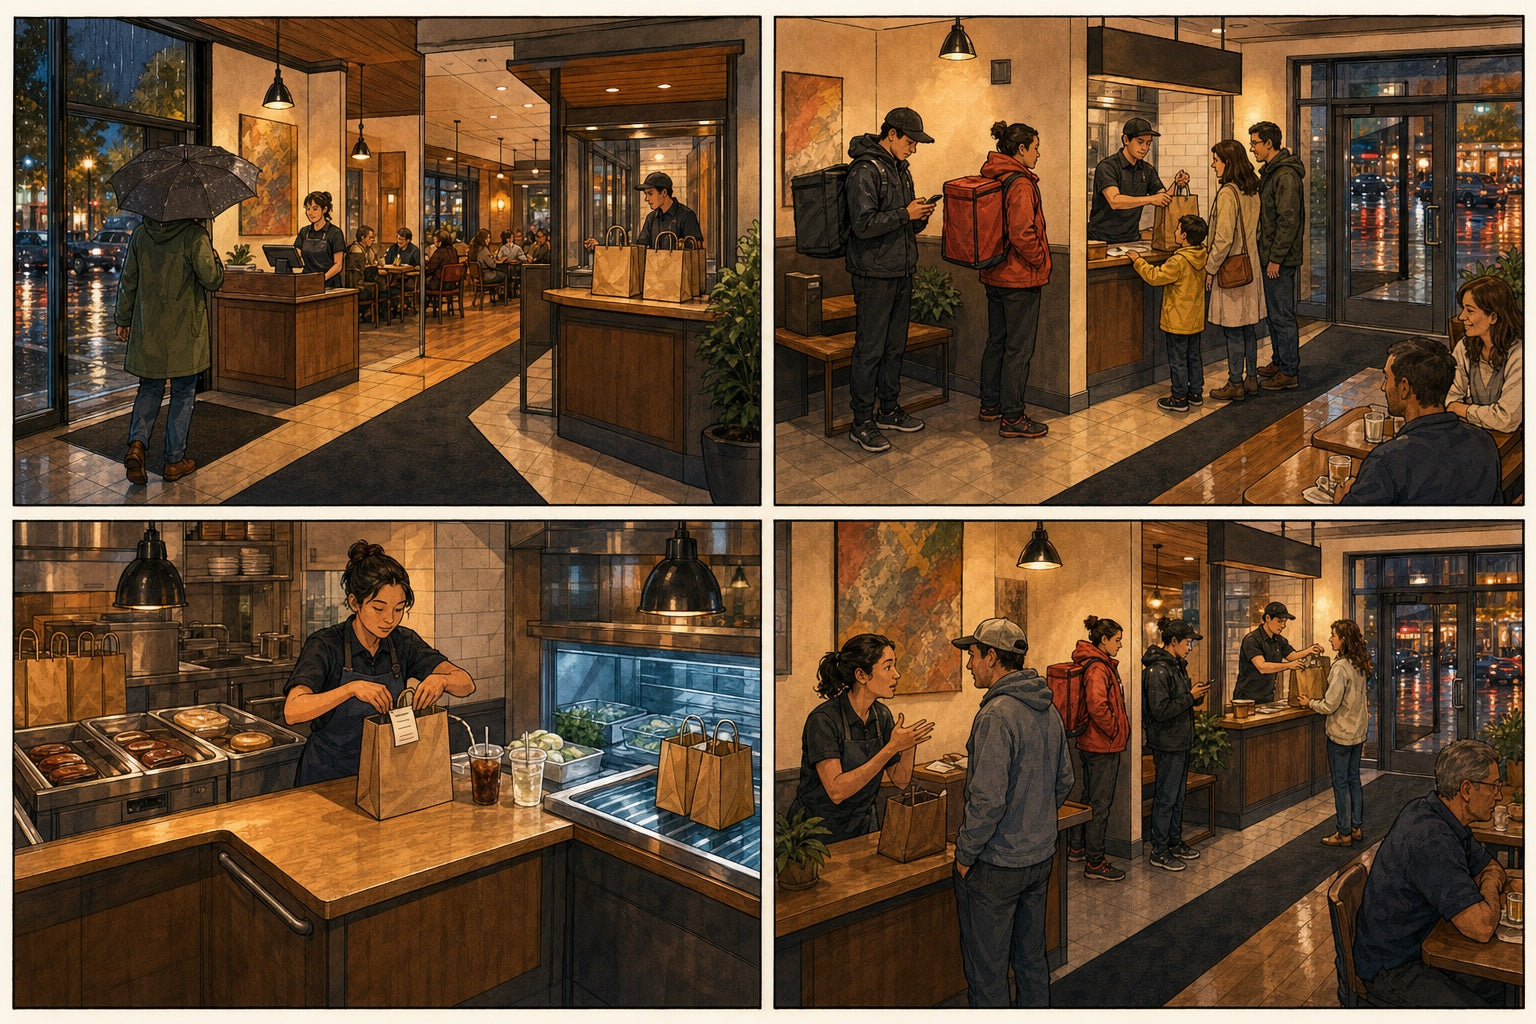
At 7:12 on a rainy Friday, the pickup counter stops being furniture and becomes a traffic system. A family is ordering. Two prepaid customers are scanning the room for bags. Three couriers have arrived together. Somebody is missing a drink. The door opens behind them, and a dine-in guest has to squeeze past the crowd to reach the host.
Design the busiest ten minutes first. The useful pickup area is not the most photogenic shelf; it is the one where four different visitors can identify their path, staff can finish and verify an order, and the door, exit, dining room, and accessible service point remain usable.
Start with four journeys, not one queue
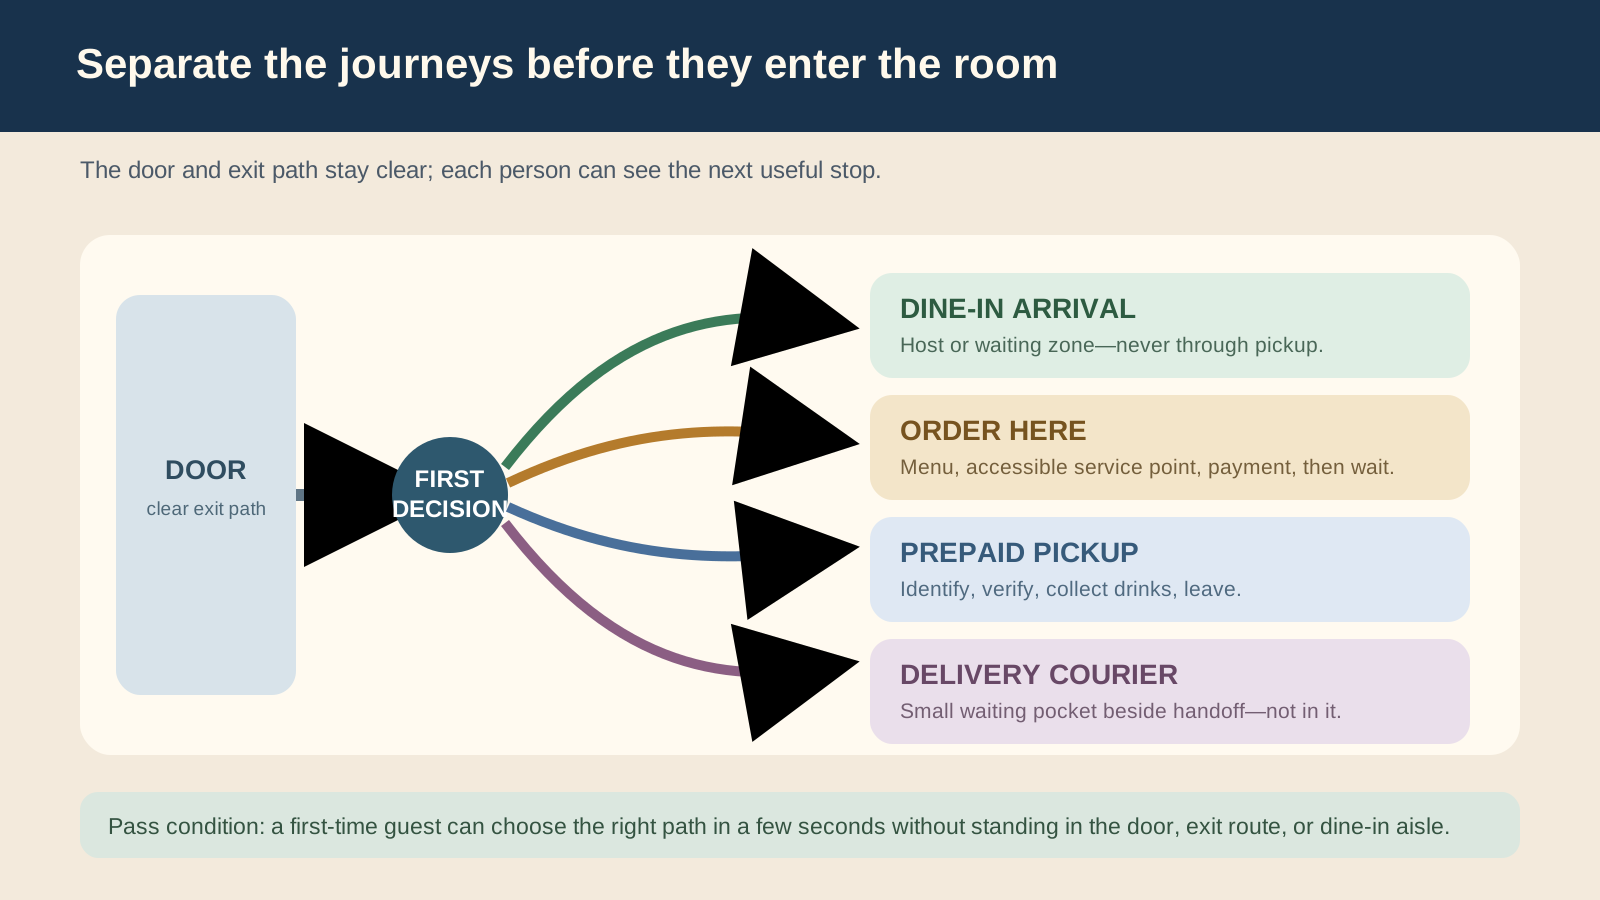
Draw these routes separately on the floor plan:
- Dine-in arrival: door to host or waiting area.
- Order here: menu to accessible service point, payment, waiting, then handoff.
- Prepaid pickup: identify, verify, collect drinks or extras, and leave.
- Delivery courier: check in, wait, receive, and leave without occupying the customer handoff.
If the lines cross at the entrance, the diagram has already found the problem. Move the first decision point, not the guest.
The restaurant entrance design guide helps protect the door, threshold, weather transition, and first sightline. The host-stand guide keeps dine-in arrival from being swallowed by pickup activity.
Make the first decision visible from the wettest arrival
Stand outside in the weather with a phone, bag, or umbrella. Enter as a first-time customer and stop where a real person stops. From that point, the next action should be obvious without scanning the entire room.
Use a short, changeable message at eye level: order here, prepaid pickup, courier check-in. The design does not need a wall of instructions. It needs one visible distinction between journeys, repeated at the relevant counter or waiting pocket.
Avoid placing the main instruction on the counter surface. A crowd, bag, plant, or person will hide it. Avoid relying on colour alone. Use wording, position, shape, and lighting so the paths remain understandable to more people and in varied conditions.
A small display frame such as the wood-and-acrylic 6-inch frame can be a mock-up tool for temporary pickup messages, but verify its real size, stability, readability, cleaning, and placement. Do not let a decorative frame become the only wayfinding system.
Integrate accessible service into the normal route
Accessible ordering and pickup should not send a customer to a side procedure that staff forgets. The approach, counter section, communication, payment, and handoff should provide equivalent service and remain free of stored bags, tablets, and décor.
For US projects, the Department of Justice’s 2010 ADA Standards cover sales and service counters, queues, waiting lines, and related elements. The guidance treats order and pickup as different services when they occur at different counter locations. Local accessibility law and the actual alteration or construction scope still decide the project; involve a qualified accessibility professional where needed.
During the mock-up, include people using a wheelchair or mobility device, people carrying children or multiple bags, guests who are deaf or hard of hearing, and guests who need more time to read or communicate. Do not treat a clear floor patch as the entire experience.
Give prepaid pickup and couriers different waiting behaviour
A prepaid guest wants to verify and leave. A courier may arrive before the order is complete and wait through several handoffs. If both use the same narrow counter edge, the longer dwell blocks the faster journey.
Create a courier pocket beside pickup, not inside it. It can be modest: a clear standing zone with a visible check-in point and a sightline to staff. Keep it outside the door swing, exit route, dine-in host queue, server path, and accessible counter approach.
Do not fill the pocket with spare chairs unless seating is part of a tested plan. Chairs migrate, collect bags, and turn a short standing zone into an obstacle. The restaurant waiting-area guide provides a fuller audit for dwell, seating, queues, and routes.
Size the handoff landing with the largest real order
The average order is not the useful test. Build the largest normal order: multiple hot bags, cold components, drinks, sauces, and receipt or identifier. Add the customer’s phone and hands.
The landing needs space to:
- keep verified and unverified bags distinct;
- hold the complete order without stacking drinks on food;
- let staff point out components without opening or rearranging everything;
- keep the customer side clear enough for a stable handoff;
- avoid exposing other customers’ names, receipts, or order details;
- clean between spills without shutting the entire route.
A decorative shelf is not automatically pickup shelving. Verify load, cleanability, depth, edges, anchoring, reach, temperature exposure, food-protection procedure, and whether customers or staff retrieve the order. A wall-mounted display shelf may help you mock up scale, but its product page does not establish suitability for food holding or commercial service.
Build the staff side as a one-direction packing sequence
Staff should not zigzag between printer, hot holding, cold drinks, sauces, and the handoff counter. Map the order from completion to departure:
- Receive the completed food at a defined packing start.
- Build and verify the bag against the venue’s order process.
- Add separate components such as drinks or cold items from their controlled location.
- Apply the approved identifier without exposing more customer information than needed.
- Move the complete order to the correct holding condition or directly to handoff.
- Verify the recipient and transfer the order.
Put printers, tablets, chargers, cables, spare paper, labels, and cleaning supplies where they support that sequence without using the accessible customer counter or the food landing as storage. New outlets, circuits, data, charging, and cable management belong in the electrical and technology plan—not in a power strip added after opening.
Separate orders by condition before separating by name
Hot, cold, frozen, ambient, allergy-managed, and otherwise special orders may need different protection, timing, equipment, or procedures. Do not let an attractive open shelf override the restaurant’s approved food-safety system.
The FDA Food Code is a US model code that jurisdictions may adopt or modify. The local regulatory authority and the venue’s food-safety plan govern actual holding, time/temperature control, contamination prevention, labelling, and handoff. Design the furniture around those requirements after they are defined.
Avoid public self-service pickup merely because it looks fast. Wrong-order collection, tampering, privacy, allergens, missing components, and temperature control all need an operating answer. Staffed handoff may be the better choice even when a shelf is present behind the counter.
Give drinks their own verification step
Drinks are commonly prepared in a different zone and forgotten at the handoff. Put a visible drink check in the packing sequence. Decide where finished drinks wait, how they remain associated with the bag, and how the customer carries the complete order away without returning through the queue.
Test cup carriers, sealed drinks, soup, and the heaviest bag together. Watch the transfer. If the customer must set one component on the floor or another counter to pick up the rest, the landing or sequence is incomplete.
Create a recovery position for delayed and wrong orders
One delayed order should not stop the ready-order line. Establish a small recovery point where a staff member can explain, check, correct, or remake without blocking the main handoff.
The recovery point needs:
- a clear owner during peak;
- access to order information without showing other customers’ details;
- a safe place for the customer or courier to wait;
- an escalation route that does not require shouting across the room;
- a way to rejoin the handoff when the order is complete.
This is the fourth panel in the illustrated story: the problem is handled at the side while the ready order continues through the main counter. Good flow is not the absence of exceptions; it is the ability to absorb them.
Light the route, staff face, and landing separately
The pickup area needs enough visual information for guests to find the right path, staff to verify components, and everyone to move safely. It does not need to become the brightest object in the restaurant.
Use the restaurant lighting layers guide to separate:
- service light at ordering, packing, verification, and payment;
- route light from door to counter and back out;
- focal light on the current message or handoff point;
- ambient light that connects pickup to the rest of the room.
Keep portable table lamps on dine-in tables unless they have a documented role and operating plan elsewhere. A loose lamp, charger, or cable on the pickup landing consumes the exact space needed for bags and hands.
Protect the exit before styling the wall
Waiting bodies, umbrellas, bags, courier backpacks, strollers, and chairs are part of the plan. Tape the door swing, route, queue, courier pocket, accessible approach, and pickup landing on the floor. Then run the peak mock-up with people and realistic objects.
In the US, OSHA’s exit-route requirement is one workplace baseline, including that exit routes remain unobstructed and adequately lighted. Local fire, building, accessibility, and occupancy requirements govern the venue. Do not treat a floor-tape exercise as approval.
Wall art, plants, shelves, and signs can support the route only after the clearances and operations work. A decorative object that projects into the waiting shoulder line is not wayfinding.
Control sound so staff do not have to shout
Pickup zones combine door noise, kitchen sound, notification tones, customer conversations, and hard surfaces. A larger sign will not fix a handoff that nobody can hear.
During the busiest ten minutes, stand at the customer position and listen for:
- whether staff can call or confirm an order at a normal voice level;
- whether the courier pocket hears private order details;
- whether notification sounds compete with dining;
- whether the open door or vestibule masks communication;
- whether delayed-order conversations spill into the main line.
The restaurant acoustic design guide explains the broader absorption, separation, and operational checks. Do not claim decorative greenery, fabric, or wall art as tested acoustic treatment without data.
Run the ten-minute peak test
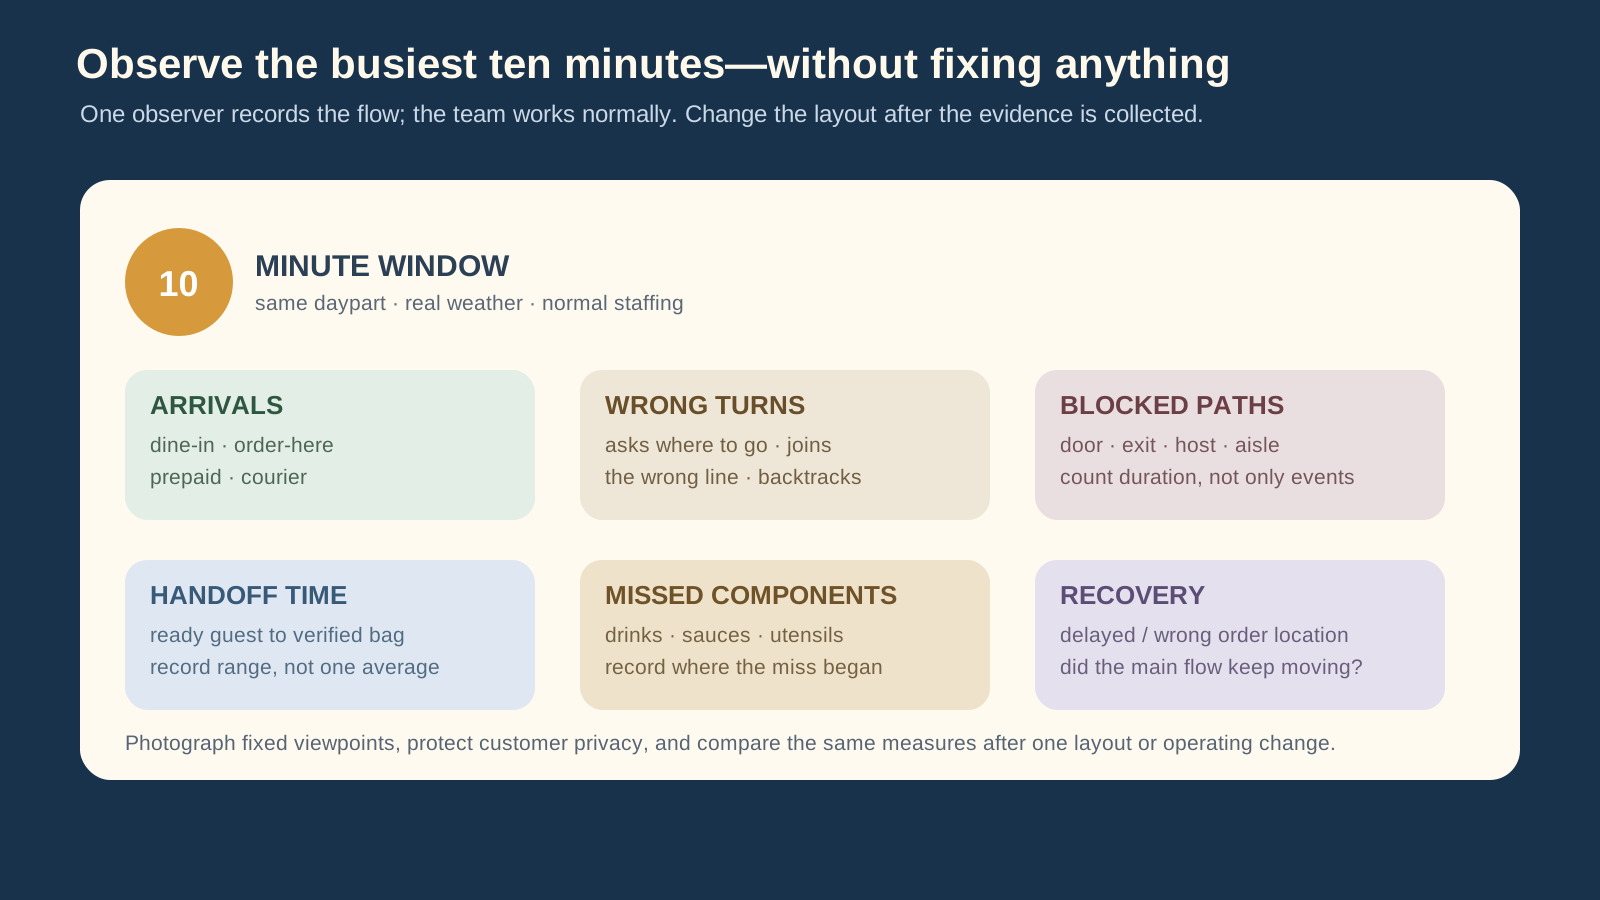
Choose the busiest representative ten minutes. One observer records; the team works normally. Do not fix the layout mid-test.
Record:
- arrivals by journey: dine-in, order-here, prepaid, courier;
- wrong turns, questions, and backtracking;
- door, exit, host, accessible counter, or aisle blockage and its duration;
- time from ready guest to verified handoff;
- missed drinks, sauces, utensils, or special components;
- delayed or wrong-order recovery and whether the main flow kept moving.
Protect customer privacy in notes and photographs. Use fixed viewpoints that document the route without publishing identifiable customer information. Repeat the test after one change so the team can see whether the result improved instead of relying on memory.
Opening, peak, and closing standards
Opening: messages current, route and accessible counter clear, devices charged, printer stocked, landing clean, holding equipment ready under the venue’s procedure, and recovery point empty.
Peak: roles assigned, courier pocket managed, bags and drinks verified, delays moved to recovery, personal data protected, spills isolated and cleaned, and no overflow into door or exit.
Closing: unclaimed orders handled under policy, surfaces and equipment cleaned, devices and identifiers secured, floor and wall checked for damage, waste removed, and one issue logged for the next layout review.
The standard should fit on one page. A thirty-heading design document is useful during planning; the shift needs a short operating sheet.
The useful handoff
A good pickup area does not make customers admire the shelf. It lets them understand where to go, receive the correct complete order, and leave without colliding with the people who came to dine.
Start by drawing the four journeys. Mock up the largest order and the recovery position. Observe the busiest ten minutes. Then change one thing: the first decision, courier pocket, landing, packing sequence, drink check, or recovery route. That is how a pickup counter becomes a system the team can repeat.
Keep reading

guest-experience
Restaurant Restroom Cleaning Checklist and Inspection Log
Use this restaurant restroom cleaning checklist for opening, service inspections, supplies, fixtures, floors, waste, incidents, and closing records.

dining-room-operations
Restaurant Dining Room Cleaning Checklist: Turn to Close
Use this restaurant dining room cleaning checklist for table turns, high-touch points, spills, service stations, floors, opening, and close.

food-safety
Restaurant Kitchen Cleaning Checklist for Every Shift
Use this restaurant kitchen cleaning checklist to control opening, between-task, four-hour, closing, and weekly work without vague assignments.